
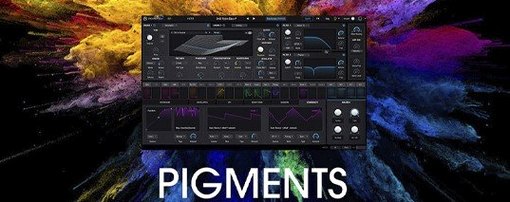
 Download for the office Mac (1.8 GB)
- Current version
- 7.0.1-6772
- Software maker
- Arturia
- Language support
- English
- License
- K'ed by MORiA
- macOS versions
- macOS 11 or later
- Processor type
- Apple Silicon, Intel 64-bit
| System | macOS 11 or later |
|---|---|
| Chip | Apple Silicon, Intel 64-bit |
| Download | 1.8 GB |
| Earlier versions | 5 on record |
Arturia Pigments 7.0.1 runs on both Apple Silicon and Intel 64-bit Macs with macOS 11 or later, so it fits most machines still in regular use. As a software synthesizer plugin, it sits directly on an instrument track in your DAW, handling lead, pad, bass, or anything else you need to design from scratch. Its hybrid engine combines wavetable and virtual analog synthesis, which makes it a practical choice for a single go-to synth in a session.
- On a track: use it for the main melodic parts, where you can tweak the color-coded interface quickly during playback.
- On a bus: route multiple synth tracks through one instance for a cohesive texture, using its built-in effects as a shared processing stage.
- For sound design: dig into the wavetables, samples, and noise sources to build textures that sit under or around the mix.
- For quick results: the redesigned Play Page and 150 new factory presets get you moving without menu hunting.
- For learning: in-app tutorials walk you through the controls, which helps when you're new to hybrid synthesis.
- For final polish: the new Rage, Ripple, and Reverb filters plus the Corroder effect shape the tone before it ever leaves the plugin.
Building a pad sound from scratch
Start with a single instance of Pigments on a stereo instrument track. I usually begin on the wavetable engine because it gives a broad tonal base without being too aggressive. Pick one of the new wavetables from version 7.0.1 — the factory set now includes 50 of them, so there is plenty to scroll through. Once you hear something that holds a long note well, switch to the virtual analog section and layer in a simple saw waveform an octave lower. That combination gives the pad body on the bottom and motion on top.
From there, go to the modulation section. Drag a modulation source — an envelope or an LFO — onto the filter cutoff. The drag-and-drop modulation in Pigments makes this step quick. Set the LFO rate slow, around a quarter-note tempo, so the filter opens and closes gradually over several beats. Now add the new Ripple filter from the 7.0.1 update. It adds a resonant shimmer that works well on sustained sounds. Adjust the mix so it sits behind the main tone rather than dominating it.
Finish with the built-in reverb. The new Reverb filter in this version is worth trying here because it was designed to pair with the synth engines. Dial in a medium hall setting, long decay, and keep the wet level around 30 percent. That gives the pad space without washing out the low end. If the sound needs grit, insert the Corroder effect at a low percentage before the reverb. It adds a slight distortion that helps the pad cut through a dense mix.
The redesigned Play Page focuses on essential controls
The biggest visible change is the redesigned Play Page. Before 7.0.1, getting to a playable preset meant navigating the full synthesis interface every time. Now the Play Page gives you a focused view with the essential controls — volume, filter, envelope, effects — without the engine details. For a session where you are flipping through presets quickly, this saves a lot of tab switching.
Beyond the interface, the new filters change how you shape sounds. Rage, Ripple, and Reverb are not just effects; each one alters the character of the sound differently. Rage is aggressive and works for leads or basses that need to punch through. Ripple adds a resonant texture that works on pads and atmospheres. The Reverb filter is a reverb with a filter built in, so you can darken or brighten the tail without adding a separate EQ. These three are now part of the effects chain, not separate inserts.
The Corroder effect is a bit crusher and lo-fi processor in one. It is not subtle, so beginners often overdo it. At low settings it adds a tape-style warmth; at higher settings it turns a clean pad into a broken radio signal. The 150 new presets give a good tour of what these new tools can do before you start twisting knobs yourself.
Pull the default filter envelope back to 60 percent
When you open Pigments for the first time, the default filter envelope can be too steep for most work. Pull the envelope amount back to about 60 percent. That keeps the filter sweep audible but not piercing. Next, in the modulation section, set the default LFO sync to tempo instead of free. That way your modulation stays locked to the session tempo from the start.
Another setting many people miss is the voice count. Pigments defaults to a high polyphony count, which uses more CPU than needed for most parts. For a lead or bass, set it to 4 or 6 voices. For a pad, 8 is usually plenty. You can always raise it later. Finally, turn on the in-app tutorials from the menu once. They show you the interface layout and engine controls, which cuts down the time you spend guessing what each knob does.
Don't ignore modulation until the sound is finished
The most common mistake is ignoring the modulation section until the sound is finished. Modulation is where Pigments gets its character. Adding an LFO or envelope after you set up the filter and effects often forces you to adjust everything again. It is better to sketch in a basic modulation early, even if you plan to change it later.
Another mistake is using too many engines at once. Pigments can layer wavetable, virtual analog, samples, and noise simultaneously, but that does not mean you should. Start with two sources max. Layering all four usually creates a muddy sound that is hard to fix with EQ or effects. Build in stages: pick one engine, shape it, then decide if you need a second.
Beginners also tend to leave the built-in effects at their default settings. The new Reverb filter in 7.0.1 sounds good out of the box, but the default decay is long for most parts. Shorten it to match your track tempo. Similarly, the Corroder effect at default settings can overwhelm a sound. Set the mix lower than you think and bring it up gradually. These small adjustments make the difference between a preset that sounds like a demo and one that fits your actual mix.
Pigments handles the heavy lifting of synthesis and effects in one place, so you can keep your session tidy and focus on the music.
- Redesigned Play Page for quicker patch tweaking.
- New Rage, Ripple, and Reverb filters.
- Corroder effect added.
- 150 new factory presets, 50 wavetables, 30 samples, and 20 noises.
- macOS 11 or later
- Apple Silicon or Intel 64-bit
- Interface language: English
Questions from the office
Does Arturia Pigments 7.0.1 work on Intel Macs?
Yes, it supports both Apple Silicon and Intel 64-bit Macs, so older Intel models are covered.
What macOS version do I need for Arturia Pigments?
You need macOS 11 or later. The plugin runs on either Apple Silicon or Intel architecture.
What new filters are in version 7.0.1?
Version 7.0.1 adds Rage, Ripple, and Reverb filters, plus the Corroder effect and 150 new presets.
Installation steps
- Read the included installation instructions.
- Follow the activation instructions that come with the package.
 Questions and replies
Sign in or set up an account to leave a comment.
No one has commented here yet. If you have used this build, the useful note is where it failed.
Same shelf: VST Plugins
All VST Plugins titles Arturia Piano V3
3.3.3 VST Plugins 361 MB
 Arturia Mellotron V
1.9.3 VST Plugins 2.1 GB
 Arturia FX Collection
2026.02 VST Plugins 16.1 GB
 Arturia Emulator II V
1.6.2 VST Plugins 700 MB
 Arturia Efx AMBIENT
1.0.0 VST Plugins 285 MB
 Arturia Analog Lab V
5.12.6 VST Plugins 2 GB
 Ample Sound Ample Guitar LP III
4.0.1 VST Plugins 9.2 GB
 Ample Guitar M
4.1.0 VST Plugins 5.2 GB

